Sunday, April 10, 2011

14th&15th Week : Presentation

My Poster


Manipulating Images


12th Week : Case Study 3

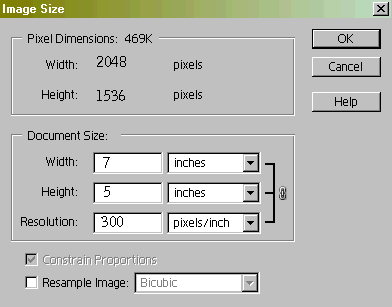
Here's the scenario - a print shop/graphics designer/magazine asks a client for a photo at 300 dpi. They wish to print it out 7" x 5". The client already has a beautiful digital photo with pixel dimension of 2048 x 1536. The client notices that the photo editing software is showing that the photo is set to 72 dpi. So, following orders, the client types in 300 to reset the dpi to 300. In doing so the image is resampled and is enlarged over 4 times to pixel dimensions of 8533 x 6400. The client sends this enlarged 300 dpi photo. The print shop/graphics designer/magazine rejects it (too grainy, too colour blotched). The client is crushed.

The sad thing is that the client already had the perfect photo (2048 x 1536 @ 72 dpi) which would have been beautifully printed at 7" x 5" ( at 292.6 PPI). The print shop / graphics designer /magazine didn't know what they really wanted. - READ WHAT PRINT SHOP REALLY WANT and the client didn't know how to change the DPI without resizing the image to give the print shop what they mistakenly think they need - READ HOW TO CHANGE THE DPI.


ANALYZE THE ABOVE PROBLEM. PREPARE YOUR REPORT IN YOUR BLOG ON UNDERSTANDING WHAT IS DPI?

Solution


Resolution dpi = (pixels of length) / (inches of length)

Resolution is the measurement of how many dots/pixels fit into one inch.
• The higher resolution, the sharper the image will be.
• Recommends resolution: 300 dpi (dots per inch)for crisp, clear results.
• Lower resolution images appear fuzzy, jagged and blurry.
• Enlarge an image, the resolution decreases;reduce an image,the resolution
increases.


DPI
•Dots per inch (dpi)
•Dots per inch (dpi) refers to printed dots and the space between them
PPI
•Pixels per inch (ppi)
•Pixels per inch (ppi) refers to the square pixels in a digital image.
•This will affect the print size and quality of your photo.
**Many companies will ask for images at 300dpi when they really mean 300ppi.


Resampling is the name for the process which figures out how best to subtract (or add) pixels when the number of pixels in the image is changed.
With resampling, the client change the 72ppi image to 300ppi. The pixel dimension of image is increased from 2048 pixels to 8533 pixels at the same time. This is not suitable for printing as 7” x 5” image.

DPI = 8533 pixel / 7"
= 1219

Increasing the pixels of image is a bad idea, because the created pixels are generated by the computer and the results aren’t usually that good. It's good to save the original large file. 1219 PPI for printing is too blotch for the image.

The client should unchecked the resampling box.


DPI = 2048 pixel / 7"
= 293

Without resampling, the pixels dimension of image is remained in same size which is already perfect photo. Thus, it doesn't effect the quality of image.

12th Week : The relationship between PPI and DPI

PPI: stands for Pixels per Inch. PPI describes the number of pixels per inch in a photo. PPI is a function of the number of pixels the camera's sensor supports (also known as megapixels) and the size of the photo. To calculate a photo's PPI simply multiply the page length by its width in inches. The result is the number of square inches on the page. Now divide the number of pixels the sensor supports by the number of square inches. The result is the number of pixels per square inch. All that is left to do is to find the square root of this number. Following is a table that shows the PPI for various page sizes for a 5 megapixel camera.

page size 4X6 – 456 PPI
page size 5X7 – 377 PPI
page size 8X10 – 250 PPI
page size 11X14 – 180 PPI
page size 16X20 – 125 PPI
page size 20X30 – 91 PPI

DPI: stands for Dots per Inch. DPI is really a physical characteristic of a printer. Every printer prints dots that when put next to each other comprise a photo. Each dot has a physical size. DPI is also known as the maximum resolution that a printer is capable of. Low-end printers have lower DPI while high-end printers have higher DPI. DPI is defined as the number of dots a printer can print per inch. For example if a printer supports 1200 DPI it means that the printer can print 1200 dots per inch (on both X or Y axis). When printing it is important to make sure that the DPI is higher or equal to the PPI. If the DPI is lower than the PPI the printer will not be able to fully display the high resolution of the photo. When printing a photo that has a lower PPI than DPI the printer will use multiple dots to represent one pixel. As opposed to PPI, DPI is not relative to the page size. DPI is a fixed number for a given printer.

From Link : http://www.streetdirectory.com/travel_guide/104309/photography/the_difference_between_dpi_and_ppi.html

9th & 10th Week : Manipulating Digital Image


8th Week : Photography Composition

Photography Composition

1. Simplicity

There is a reason why simple is king. Cut the frills, cut the distractions, cut the clutter. The more objects you remove from the picture, the clearer and sharper your story and subject will be to the viewer.


2. Rule of third

One of the most crucial element of making great photographs is the composition and you can make good composition by following the rule of thirds. The rule of thirds in the photographic composition speaks about the placement of the subject in the third part of the frame — where the photographic plane is divided into three equal parts either vertically, horizontally or diagonally.


3. Framing

One of the easiest ways to take a creative photograph is to compose your subject with a frame around it. A photographic frame is an object that that acts as a border or frame for your subject. The frame directs the viewer’s attention to a particular subject or point of interest within the photograph. Frames also create perspective and show depth.


4. Balance

Good balance in photography requires the correct combination of colors, shapes, and areas of light and dark that complement each another. By looking at your subject and capture it from different viewpoints, angles or even at different lighting, you can composed a balanced image. Rearranging the elements can also make the wanted effect. And here is a simple tips, try to make a triangular shape from the elements you capture, this will create a sense of stability.


5. Line

Lines can be effective elements of composition, because they give structure to your photographs. Lines can unify composition by directing the viewer's eyes and attention to the main point of the picture or lead the eyes from one part of the picture to another. They can lead the eyes to infinity, divide the picture, and create patterns. Lines can lend a sense of depth to a photograph.

Thursday, February 17, 2011

7th Week: Outdoor Shooting Session

We are having outdoor shooting session at Tasek UTM this.
Here is my 1st Digital Photo Album:

6th Week: Studio Photo Session

Image for studio photography


Studio photography is capture picture under well-controlling of light such as soft light, hard light, hair light and background. Hard light is generated by a small or far-away light and result in strong shadow. Example of hard lights are the sun(not small but quite far away) and bare bulbs. Soft light is generated by a large diffuse light and results in shadow-free images because there are many paths from the source to the object. Examples of soft light are an overcast sky, a north-facing window close to the subject, a bulb reflected off an umbrella placed close to the subject.


Studio Set Up
Actual we need at least 2 lights : a main light and background light. It is best to use a soft box on the main light, as it will create a much softer light than a umbrella. A background light or a hair light is needed to create separation between the background and the subject. Otherwise, the photograph will look flat. Another light as a fill light would be nice to fill in some shadow. However the reflector will do the job. Or making a large piece of styrofoam or white carboard.


Flash Metering
A device that measure ambient light, light ratio, calculates how many pops of lower-powered studio strobe system. Flash Metering helps us to set our camera to get right exposure.


Umbrella Vs Softbox

The umbrella sends light everywhere, trying to gel a backgroung light with something other. Whereas, softbox sends very little light to the background.

Wednesday, February 2, 2011

4th&5th Week: Lesson & Practical 2

The 4th week lesson is about lens and some composition of picture.


There are many type of lenses. Lenses options from macro lens, wide angle lens, standard lens to telephoto lens. Depends on the usage for the camera novices.

Here is the picture I take for my 2nd handling of DSLR:

Slow Shutter Speed


Fast Shutter Speed


Large Aperture


Small Aperture

3rd Week: Lesson & Practical 1

This week lesson is about shutter speed and aperture too.
This is a picture regarding the functional of both aperture and shutter speed:


I am a 1st timer is photography, here are the pictures that I capture during the first handling of DSLR:


Please comment.

2nd Week: Aperture & Case Study

The 2nd Week lesson discusses on the aperture.
Below image is what I understand about the functional of aperture.
Besides that, Dr. Dayang also discuss on the issue of the differences of the digital compact camera and the DSLR.
As consumers, there are a few aspects we need to consider before purchasing or upgrade a camera.


Case Study 1:

There are huge differences between the little point and shoot cameras and DSLRs. I'm just highlighting some important differences:


1. Image quality.
A DSLR have much better images quality over the point and shoot camera. It produces awesome image qualities especially the pro level cameras.

2. Responsiveness & Performance.
Point and shoot cameras are not designed to be fast and responsive. Most of the recent DSLR can start and operate instantly.

3. Interchangeable lens
All the point and shoot camera has only one build in lens; thus limiting its ability. For DSLR, you can choose the lens to suit your needs.

4. Easy of use
This is the area that point and shoot camera may have the upper hand. Only a click of a button, she got the image taken. For DSLR, the complex menu setting and control system can easily scare camera novices away.

5. Cost and weight
When you have a better product, you normally expect to pay more. This is true too when it comes to camera. DSLRs are generally much better built with better components and software. For point and shoot cameras, it cost less and weight less too.

I hope that I've summarized the major differences between DSLR and point and shoot cameras. Which one to purchase will be determined by how you want to use it.

For more info, please go to http://www.digital-photography-school.com/should-you-buy-a-dslr-or-point-and-shoot-digital-camera

Tuesday, January 25, 2011

1st Week: Introduction & Briefing

The 1st Week lesson is a short brief and introduction from Dr. Dayang.

I am so unsteady because I don't have any experiences on handling a DSLR either hands-on or any terms.

Everything is very new to me.

It is the 1st time I take a course regarding to photography.

Before this I thought imaging can be done by photoshop but now I know it is more than that.

I will try my best to learn to take a good picture with the DSLR.